Conditions of Use
Meltin Vaste CrabWood Foam wall boards are intended for normal conditions of dry internal use. All performance testing of Meltin Vaste CrabWood Foam wall boards has been carried out using dry ex-factory product. Meltin Vaste CrabWood Foam wall boards can be exposed to liquid water or be installed in situations where extended exposures to humidity’s of 95% .
The existing suitable surface finish can withstand wet areas where liquid water or high humidity can be expected. Vinyl wallpaper, acrylic emulsion, and gloss and semi-gloss alkyd paints are suitable coating systems if desired. It would be preferred that Bathrooms, kitchens and laundries have adequate ventilation or heating to avoid condensation build up.
Meltin Vaste CrabWood Foam wall boards is a finishing material and must be fully protected on construction sites and during construction from direct or indirect damage, excessive sunlight or moisture.
Planning and Measuring
- Good planning of sheet layout is important. This will reduce wastage and keep the number of joints to a minimum, saving time and extra costs.
- On walls the use of maximum sheet sizes minimises the occurrence of end butt joints. Where end butt joints occur they must be formed, preferably, between framing members where joints can be neatly finished if not boards should be in level with each other.
- Sheets may be fixed either vertically or horizontally and should ideally run right through and over door and window openings. The window and door openings can then be cut out when sheets are in place.
- Joints can occur near flush to door or window frame corners or on jamb studs but an 8-10 mm gap should be maintained to allow for timber frame movements as this is a point of stress.
Delivery, Handling & Storage
- Where possible CrabWood Foam Boards should be delivered to site immediately or just a few days before installation as this greatly reduces the possibility of damage.
- Sheets should be neatly stacked on their horizontal side to avoid sheet distortion, damage. This can be achieved by stacking on a clean flat surface a minimum of 100 mm above ground level that is not susceptible to moisture. Do not stack directly on concrete floors
- Care should be taken to prevent any undue sagging or damage to edges, ends or surfaces during storage and handling.
- All materials should be kept dry, preferably by being indoors and under cover (especially when storage is likely to be for a lengthy period). While stored CrabWood Foam board should be protected from moisture (cover with plastic sheet or a tarpaulin)
- CrabWood Foam Boards can be used on areas exposed to moisture.
- It is preferred that the front face of the sheets not be placed in a horizontal position to prevent footprints and other marks or damage to the face.
- Cracked or damaged sheets must not be used.
- Floor Loadings should be considered as Meltin Vaste Foam wall boards can weigh in the range of 700–900 kg/m3.
Pre-Inspection of the Site Framework
- Check that the framing is plumb, level and square and has been erected according to the relevant building specification. The framing must have a minimum flat face width of 35mm for timber and 32mm for steel.
- Plumbing and electrical services should be installed before CrabWood Foam Board is fixed and all service ducting, pipes, outlets and switch boxes should be set back from the framing and not protrude beyond the face of the framing.
- Make sure all contact surfaces of the framing are dry and free from dirt, grease, oil or any other foreign material.
Note – The fixing of CrabWood Foam wall boards is deemed to be an acceptance of the substrate, so it is important to make sure that the above requirements are adhered to.
Framing Spacing. The spacing of framing support for CrabWood Foam Wall Board linings shall not be greater than 600mm centres for all thicknesses of CrabWood Foam wall boards. The requirements for wall and framing spacing are detailed below.
- It is recommended that Framing centres be kept at 450 mm in Bathrooms or other areas that may be subject to moisture and steam when using 10 mm CrabWood Foam Wall Board linings.
Joints and angled joints
Typically all joints and interior angles can be filled with waterproof acrylic sealant / Selly’s paint over waterproof sealant / using a fibre tape embedded in sealant and left to dry. All joint compound should be finished smooth using a spatula or scraper and free of tool marks and ridges.

Selleys Paint over Sealant
Surface Joints
Painting over sealants
We would recommend ADOS Plastic putty to fill all scratches / screw holes and accidental dents to CrabWood Foam Wall board surfaces. The filled in surface needs to dry before sanding and painting.
A Versatile Medium Weight Filler
 ADOS Plastic Putty is an all-purpose, versatile, fast curing, medium weight polyester filler. It gives an extremely high quality finish for general body filling on a variety of surfaces.
Please ensure you apply the filler in 2-3 coats to ensure proper drying between coats.
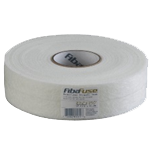
Joint Tape

New Type Self-Adhesive Fiberglass Mesh Tape
Self-adhesive fibreglass mesh is thin and light, but strong and easy to use, greatly increases joint strength and durability for less cracking.
Features and benefits
- Self-Adhesive fibreglass mesh drywall joint cross-section.
- Force compound into all joint.
- Need to be coated a layer of compound.
Uses
- For perfect repairs and a quality finish on a variety of surfaces – , bricks, concrete blocks, wood, masonry, metal, fiberglass, most plastics and many other materials.
GENERAL WALL INSTALLATION
The following section covers the installation of CrabWood Foam Boards in general wall applications.
Inspection of the Framing
- Flatness of Framing :
Inspect the surface of the framing and ensure that it is flat. In particular take note of nails not protruding over the surface, nogs not flush, hold down straps not checked in flush to the surface etc.
- It is important to ensure the framing is dry and to understand the effects of framing moisture on the overall finish of the wall linings.
Insulation Material
The CrabWood Foam Board Installer /contractor /builder needs to ensure that insulation material is not bulging out of the framing. Otherwise this will apply pressure on the CrabWood Foam wall Board .These issues must be corrected prior to the fixing of CrabWood Foam Wall Board to the framing.
Once CrabWood Foam Wall board fixing starts, this indicates that there has been an acceptance of the substrate quality. Therefore it is the responsibility of the framing contractor to ensure that the substrate will allow the CrabWood Foam Board Installer to fix in accordance with Meltin Vaste’s / manufacturer’s instructions and recommendations.
Furthermore it is important for the CrabWood Foam Board Installer to provide a suitable surface, for the joint fixer to conduct the stopping/ patching process in an effective way.
Cutting CrabWood Foam Board
- CrabWood Foam wall board is easily cut using conventional tools (Saw) or power tools.
- Cut-outs for switch boxes and other penetrations should be marked before cutting commences.
GENERAL WALL INSTALLATION
Fixing to wall Adhesive/Screw
- Fix CrabWood Foam Board wall ceiling sheets vertical or horizontal as desired.
- We recommend 10/12 mm sheets suitable for wall panelling.
- Apply adhesive to battens or studs at 200 mm centres between centre and edge of sheet.
- Start fixing from the centre of each sheet outwards.
- Position the sheet hard up to the framing, single screw at the centre line and the edges across each batten.
- Nailing is not recommended.
- Single screws to be minimum 12 mm from sheet edge.
- Press the plasterboard where adhesive has been applied to ensure full contact.
- Sheet end joints can be made on framing. If not ensure the boards are in level with each other.
- Adhesive can be applied to the sheet edges or under screws.
- All joints between sheets should be filled with ADOS plastic putty and finished smooth.
- Use long length sheets to minimise sheet end butt joints.
GENERAL WALL INSTALLATION
Fixing to Walls
Timber Frame Vertical Method
Wall Framing Dimensions for framing must comply with NZS3604:2011 requirements.
- Timber framing moisture content should be between 12-18% when lining is installed.
- Studs must be spaced at 600mm centres maximum when using either 10mm or 12mm CrabWood Foam wall Boards
- Leave a 5–10mm gap at the floor level to allow for movement in timber framing.
. • For wall heights at 2400mm high, nogs need to be set at 800mm centres.
- Only screws should be driven in to the foam Boards at right angles and to a depth so that screw heads are seated in a slight recess.
- For wall heights at 2700mm high, nogs need to be set at 900mm centres.
Fastening the Linings
- Leave a 5–10mm gap at the floor level to allow for movement in timber framing.
- Brush apply adhesive to all studs and nogs at maximum 300 mm centres.
- Firmly press the Foam Board where adhesive has been applied to ensure full contact.
- Fasteners should be at 300mm centres around the sheet perimeter.
- Screws should be fixed no less than 12 mm from the sheet edge.
- Adhesive can be applied to the sheet edges.
. • All joints between sheets should be filled with ADOS Plastic putty and finished smooth.


